
NOTE: For detailed information about database setup and all Maven dependencies, please consult the first part.
1. Adding Maven Dependencies
To allow using annotations for mapping Struts action classes, the Struts2 Convention Plugin is required. Put the following dependency into your pom.xml file:
1
2
3
4
5
| <dependency> <groupId>org.apache.struts</groupId> <artifactId>struts2-convention-plugin</artifactId> <version>${org.strutsframework-version}</version></dependency> |
2. Annotating the Model Class
We use JPA annotations for annotating the model class (Product.java) like the following code snippet:
1
2
3
4
5
6
7
8
9
10
11
12
13
14
15
16
17
18
19
20
21
22
23
24
25
26
27
28
29
30
| /** * Copyright CodeJava.net To Present * All rights reserved. */package net.codejava.framework.model;import javax.persistence.Column;import javax.persistence.Entity;import javax.persistence.GeneratedValue;import javax.persistence.Id;import javax.persistence.Table;@Entity@Table(name = "product")public class Product { private long id; private String name; private String description; private float price; @Id @GeneratedValue @Column(name = "PRODUCT_ID") public long getId() { return id; } // other getters and setters} |
3. Annotating Struts Action Class
Now, instead of using Struts XML configuration file (struts.xml), we use annotations for mapping the Struts action class. The following code is the updated version of the ListProductAction class:
1
2
3
4
5
6
7
8
9
10
11
12
13
14
15
16
17
18
19
20
21
22
23
24
25
26
27
28
29
30
31
32
33
34
35
36
37
| /** * Copyright CodeJava.net To Present * All rights reserved. */package net.codejava.framework.action;import java.util.List;import org.apache.struts2.convention.annotation.Action;import org.apache.struts2.convention.annotation.Result;import org.apache.struts2.convention.annotation.ResultPath;import org.springframework.beans.factory.annotation.Autowired;import net.codejava.framework.dao.ProductDAO;import net.codejava.framework.model.Product;import com.opensymphony.xwork2.ActionSupport;@Action("listProduct")@ResultPath("/WEB-INF/views")@Result(name = "success", location = "ProductList.jsp")public class ListProductAction extends ActionSupport { @Autowired private ProductDAO productDAO; private List<Product> listProduct; public String execute() { listProduct = productDAO.list(); return SUCCESS; } public List<Product> getListProduct() { return listProduct; }} |
1
2
| @Autowiredprivate ProductDAO productDAO; |
Struts 2 for Beginners, 3rd Edition:
this book helps you come up to speed as quickly as possible with using
the Struts 2 framework. It is the latest book about Struts 2 to date.
1
2
3
4
5
6
7
8
9
10
11
12
13
14
15
16
17
18
19
20
21
22
23
24
25
26
27
28
29
30
31
32
33
34
35
| /** Copyright CodeJava.net To PresentAll rights reserved. */package net.codejava.framework.config;import java.util.EnumSet;import javax.servlet.DispatcherType;import javax.servlet.FilterRegistration;import javax.servlet.ServletContext;import javax.servlet.ServletException;import org.apache.struts2.dispatcher.ng.filter.StrutsPrepareAndExecuteFilter;import org.springframework.web.WebApplicationInitializer;import org.springframework.web.context.ContextLoaderListener;import org.springframework.web.context.support.AnnotationConfigWebApplicationContext;public class WebAppInitializer implements WebApplicationInitializer { @Override public void onStartup(ServletContext servletContext) throws ServletException { AnnotationConfigWebApplicationContext appContext = new AnnotationConfigWebApplicationContext(); appContext.register(ApplicationContextConfig.class); ContextLoaderListener contextLoaderListener = new ContextLoaderListener( appContext); servletContext.addListener(contextLoaderListener); FilterRegistration.Dynamic filter = servletContext.addFilter( "StrutsDispatcher", new StrutsPrepareAndExecuteFilter()); filter.addMappingForUrlPatterns(EnumSet.of(DispatcherType.REQUEST), true, "/*"); }} |
1
2
3
4
5
6
7
8
9
10
11
12
13
14
15
16
17
18
19
20
21
22
23
24
25
26
27
28
29
30
31
32
33
34
35
36
37
38
39
40
41
42
43
44
45
46
47
48
49
50
51
52
53
54
55
56
57
58
59
60
61
62
63
64
| /** Copyright CodeJava.net To PresentAll rights reserved. */package net.codejava.framework.config;import javax.sql.DataSource;import net.codejava.framework.dao.ProductDAO;import net.codejava.framework.dao.ProductDAOImpl;import net.codejava.framework.model.Product;import org.apache.commons.dbcp2.BasicDataSource;import org.hibernate.SessionFactory;import org.springframework.beans.factory.annotation.Autowired;import org.springframework.context.annotation.Bean;import org.springframework.context.annotation.ComponentScan;import org.springframework.context.annotation.Configuration;import org.springframework.orm.hibernate4.HibernateTransactionManager;import org.springframework.orm.hibernate4.LocalSessionFactoryBuilder;import org.springframework.transaction.annotation.EnableTransactionManagement;@Configuration@ComponentScan("net.codejava.framework")@EnableTransactionManagementpublic class ApplicationContextConfig { @Bean(name = "dataSource") public DataSource getDataSource() { BasicDataSource dataSource = new BasicDataSource(); dataSource.setDriverClassName("com.mysql.jdbc.Driver"); dataSource.setUrl("jdbc:mysql://localhost:3306/productsdb"); dataSource.setUsername("root"); dataSource.setPassword("P@ssw0rd"); return dataSource; } @Autowired @Bean(name = "sessionFactory") public SessionFactory getSessionFactory(DataSource dataSource) { LocalSessionFactoryBuilder sessionBuilder = new LocalSessionFactoryBuilder(dataSource); sessionBuilder.addAnnotatedClasses(Product.class); return sessionBuilder.buildSessionFactory(); } @Autowired @Bean(name = "transactionManager") public HibernateTransactionManager getTransactionManager( SessionFactory sessionFactory) { HibernateTransactionManager transactionManager = new HibernateTransactionManager( sessionFactory); return transactionManager; } @Autowired @Bean(name = "productDAO") public ProductDAO getProductDAO(SessionFactory sessionFactory) { return new ProductDAOImpl(sessionFactory); }} |
- Bootstrapping a Spring Web MVC application programmatically
- Spring 4 and Hibernate 4 Integration Tutorial Part 2: Java-based Configuration
This book: Spring Integration in Action help you learn more about enterprise integration and messaging using the Spring Integration framework.
5. Reviewing Project Structure
That’s all! So far I have discussed all the necessary stuffs in order to successfully integrate Struts, Spring and Hibernate in a Java web application. It’s time to review the project structure (Eclipse project), for your reference: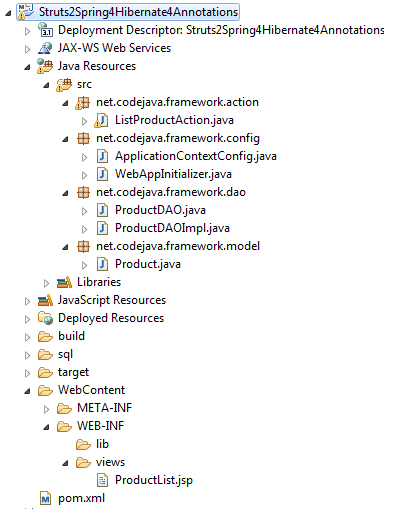 To test out the sample application, download the Eclipse project attached below.